 Hello again! It’s been a while since my last post…a lot of things have changed for us in the past couple of years, and one of the things that has changed for the better is that we are now able to do some of the things we’ve always wanted to do but never had the chance. For me, one of the things I had always wanted to do was to learn how to metal detect.
Seems like a thing for old, nerdy guys, right? Well since I’m now over 40, I can do that. 😉
A bit over a year ago, my girlfriend had found a cheap metal detector on Amazon for her son. We tried it out, and it was great at finding literally every single piece of metal-based garbage under the sun, and it was okay at finding pennies and nickels…but it was only capable of showing that something was buried in the dirt. It couldn’t discriminate at all. If there’s metal, you get a boop sound and that was about it. Then you’d dig and see what you had found. Most of the time it was an old pull tab or beer bottle cap.
There had to be a better way, right?
After a few months of learning the basics, it was time for us to get some good metal detecting equipment. I started researching metal detectors on YouTube, Reddit, and other forums, and I learned very quickly that metal detecting can be a very expensive hobby. I’ve also learned that you get what you pay for. The trick is to find a good balance and get the best metal detecting equipment that you can afford. After a lot of research, these are the metal detecting tools that we decided to go with.
Nokta Makro Simplex + — Around $250
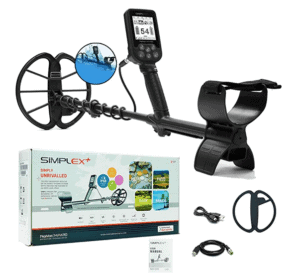 In almost every single forum I went to, people would ask about the best value metal detectors for beginners, and almost every time the Nokta Makro Simplex + was the answer that was given. There are several different packages that can be found, but the one I went with was a bare bones kit: just the detector. Some of the kits include wireless headphones, digging tools, and pinpointer (more on this later), but I decided to keep it simple.
What you get: a quality, waterproof metal detector with an 11″ coil. The Simplex has four different modes: park, park 2, field, beach (in the current software version). You’ll also get an adapter for recharging your detector (I’ve only had to charge mine twice in a year…the battery life is awesome) and another adapter for connecting your Simplex to your computer for updates.
We have used our Simplex at parks, schools, fields, and beaches and it has been fantastic! Most of our hunts are at local parks and schools, so I mostly run in one of the park modes, sensitivity set fairly low. I’m not trying to dig up ancient stuff, I’m mostly hunting for coins and stuff. I may run it deeper the next time I go out. I find a LOT of change, some random toy cars, and plenty of bottle caps, but my girlfriend has already found two silver charms and a silver ring…in one park!
Get the Nokta Makro Simplex+ on Amazon for $254.15 with free shipping (as of this post date).
Garrett Pro-Pointer AT — About $125
 Sometimes you detect a target, start digging, and then you realize that you’re looking for something that’s way harder to see than you thought it would be. Once you’ve dug your hole, you need a tool to help you find whatever small item is down there…that’s where a good pinpointer comes in handy.
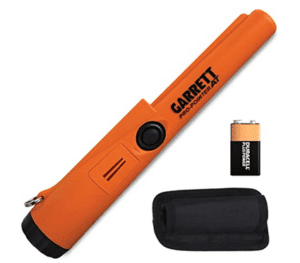
I decided to go with the Garrett Pro-Pointer AT (or as many detecting nerds call it, the Garrett Carrot…honestly I have no idea why they do that, I mean, it doesn’t resemble that nasty vegetable at all).
What you get: once again, this is a product where you can either get the basics or buy a box with the basics plus other cool things. Personally, I just kept it simple and got the basic package, which just had a pinpointer (the 9 volt battery was included, I think this is the default, but I’m not 100% sure about that) and a holster for your detecting belt (I don’t personally have one of these at the moment).
Is it worth it? Yes. A million times, yes. The Pro-Pointer AT can absolutely cut down your target recovery time drastically. It’s not the cheapest pinpointer on the market…I’ve tried those as well. Perhaps I’ll do another post demoing them in the future, but essentially (like the full size detectors) they have very limited range and generally poor-to-it’ll do build quality. It’s definitely worth the price difference.
Get the Garrett Pro-Pointer AT at Amazon for $127.45 with free shipping (as of this post date).
Digging Tools — Price Varies
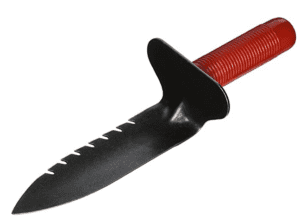 I won’t spend a lot of time going over digging tools for metal detectorists because there are a LOT to choose from. I will mention that you’re going to want at least one good hand-held digging tool. Personally, I started out with a $30 Hori Hori knife. It was great for digging in tot lots (at parks and schools…you know, the places with the swings and wood chips), but in harder soils it was a chore. Eventually I broke it. That’s not to say that it wasn’t a good tool – it was great! I just was kind of, um, not using it in a recommended way. That’s totally on me.
After breaking the Hori Hori knife, I ended up going to the hardware store and buying a $7.00 garden trowel with a serrated edge (which helps cutting through small roots) and getting a small hand-held, light duty shovel.
My girlfriend went with something a bit more formidable. When she ordered her pinpointer, it came with a finds bag (it’s a bag for holding the things you find) and a digging tool. I can’t find the exact kit, but here’s one that comes with the Pro-Pointer AT and a waterproof finds bag. The digging tool that she uses is a Garrett Edge Digger, which runs about $60 on Amazon but can probably be found other places for cheaper. There are cheaper options, like the Lesche digging tool that can be had for about $36 and is just as good as the Garrett (and some people like it more).
Get the Garrett Digger’s Pouch for $14.95 on Amazon (price as of this post).
Get the Lesche digging tool for $36.95 with free shipping on Amazon (price as of this post).
Note: you can pretty much use any shovel you want. They do have some really nice shovels and sand scoops, but we’ll get into that some other time.
The best budget metal detector kit for under $450
I remember when I was about 6 years old and I saw my great uncle’s (I think) metal detector in his garage. I asked about it, and he explained that it found metal under the ground. I wanted to try it out, but I never got a chance. When I started looking into metal detecting, I was shocked that some detectors ran into the thousands, so I decided to throw together my own budget kit.
This is my go-to current metal detecting setup:
- Nokta Makro Simplex+ Metal Detector
- Garrett Pro-Pointer AT pinpointer
- Hand Trowel from Lowe’s
- A 5-gallon bucket (for finds, also insanely handy!)
So, essentially you can build a great entry level metal detecting kit for less than $450 that will cover all of the essentials for finding coins, relics, or even treasure!
If you have been considering getting started in metal detecting, you can’t go wrong with this setup. I believe you’ll get maximum value for a great price with this set of tools.
